Hello guysA quick little one on FUMEFX inside Cinema4D. 7 Get started with FumeFX.

Fumefx Rgb Lighting Deko Lt Visual Effects Visual Clouds
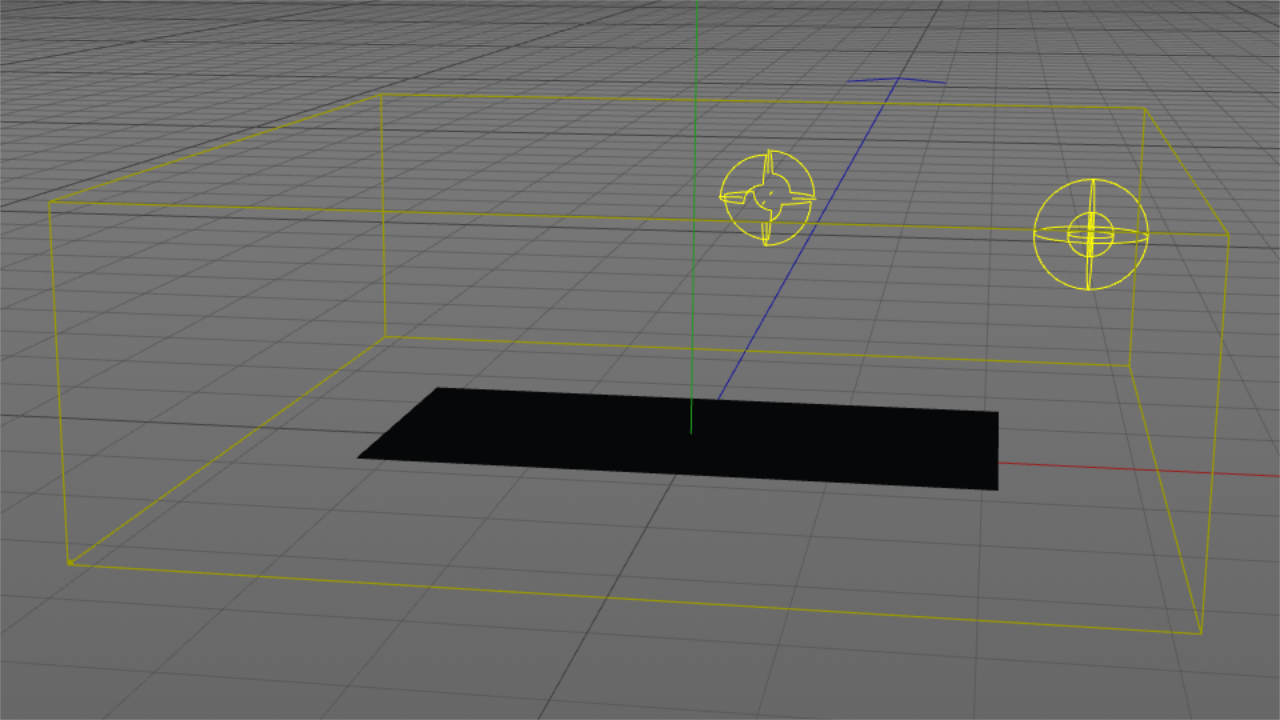
This next one also uses a very large grid but it will need to use a script inside FumeFX to isolate only the voxels inside a bounding box object.

. Click on the Particle Src button and. And these are some of the most requested visuals. Tutorial on the basics of fire in Fumefx for 3d studio max.
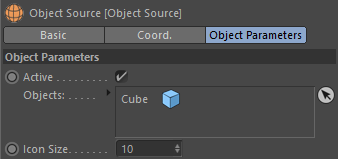
Select the ObjSRC tab in the FumeFX UI floating dialog and click the Pick button. FumeFX is a powerful fluid dynamics plugin-in for Autodesk 3ds max designed for simulation and rendering of realistic fire smoke explosions and other gaseous phenomena. Make sure it shows within the FumeFX Object Source as shown.
Hello everyone and thank you so much for joining me on my training goals. This is a 7 minute video tutorial showing how to create an explosion in Fumefx using an animated object as emiter also shows all basic tips to get nice shader and fume sculpting. Unrivalled in its ability to capture the subtlety and complexity of fluid gas behavior it is favored among visual effects artists game developers visualization professionals and everyone else who demand.
Within the FumeFX Object Source Parameters click the Pick button and then select sphere01 as your Object. There are different techniques you can use to make this effect in FumeFX for example. My name is Dan and welcome to fume effects practical projects.
In the 3ds Max view ports select the FFX Object Src01 you created earlier as your Source. With this well. Hi guys in this tutorial well be using Fume FX with 3ds Max to make a cool fire effect.
This update contains several bug fixes and new features listed below. The purpose of this video is to learn fumefx this is a collection of fumefx tutorials based on previous 6 tutorialsnew visitors can watch or download this c. This is the first tutorial I have ever made so please forgive me for my mistakes.
A multitude of parameters and FumeFX helpers give users maximum control of the fluids behavior and appearance. With these tags user can precisely control. FumeFX supplements the users artistic vision with the power of real-world physics for the ultimate in both style and realism.
Easy to use basic effects can be created with just a few clicks. Step 9 at the Modify Panel Under parameters rollout click on Pick objects Hand icon and select the teapot. This time we look at ways to use the different types inside an object source we have Solid Shell an.
Simple Source Object Source or Particle Source but this time we will use Object Source with a texture map. The max file is available on fumefx explosionrar. An object Preferably a Box to be used as the bounding volume.
In the modify tab of the Particle Src we go to parameters and select our emitter. Within the FumeFX Object Source Parameters click the Pick button and then select sphere01 as your Object. Make sure it shows within the FumeFX Object Source as shown below.
FumeFX is a powerful fluid dynamics plugin-in for Maxon Cinema 4D designed for simulation and rendering of realistic fire smoke explosions and other gaseous phenomena. Added Support for Redshift 3017 and newer. We are going to use a FumeFX Particle Source to create the Explosion.
To Create the FFX Particle Source go to the Create panel click on Helpers and select FumeFX from the dropdown list. Added Object Source Voronoi Fractures support. Make sure to disable the show in viewport setting when creating the particle src.
For example by using Simple Source Object Source or Particle Source but in this tutorial we will use Particle Source. That way fumefx has a source from which to base its simulation. There are different techniques you can use to make this effect in FumeFX for example.
Added Support for X-Particles. In this tutorial Ill show you how to create this small scale fire and smoke with the help of 3ds Max and the FumeFX plug-in. Create a FumeFX Grid over the cigarette in the Top or Perspective viewport.
FumeFX - Practical Projects. The box can be linkedanimated to follow the object you want to burn. In this training course Im going to cover different projects that you can create with fume effects.
Added Cinema4D Take system support. Welcome to TP. Sitni Sati releases FumeFX 502 update for Maxon Cinema 4D.
Unrivalled in its ability to capture the subtlety and complexity of fluid gas behavior it is favored among visual effects artists game developers visualization professionals and everyone else who demand. In this tutorial Ill show you how to create this small scale fire and smoke with the help of 3ds Max and the FumeFX plug-in. Simple Source Object Source or Particle Source but this time we will use Object Source with a texture map.
Fumefx Tutorial Just The Beginning - ID5c97e8f9c082f. Step 7 Then Click on the object source button under object type roll out. FumeFX 505 release for Maxon Cinema4D adds a great new feature to the Object Source - support for Object Tags.
Step 8 Create the object Source inside the grid. First we create the boundary box geometryfumefx then we create a particle source helpersfumefxparticle src. Next create a FumeFX Source Object helper in any.
By doing so we have successfully set the Teapot object. Make sure the height of the FumeFX Grid volume is about 115 units. 8 Get started with FumeFX.
Isolate Bounding Box Script.
Making Of Fumes Fx 3dtotal Learn Create Share

Fumefx C4d Essentials Object Source Tags Youtube

Fumefx Cinema 4d Object Source Volumes Youtube

Pin On Tips

Fumefx For 3ds Max Essentials Part 2 Simulation Basics Youtube

Video Tutorials
Object Source
Tutorial 14 Object Source And Texture Mapping
0 comments
Post a Comment